Sliding Miter Saw: A Do-It-Yourself Frame Buddy
Frames, whether it is for photos, cabinets, holders or any furniture, may appear to be very simple yet making it actually requires precision. The secret to a perfect frames relies on the angle of the corners of the opposite sides which need to rightly fit. What we want to achieve, as always, is to avoid gaps on the angles on each corner.
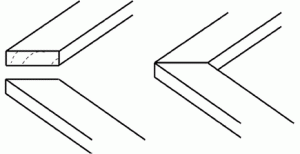
When there are unwanted gaps between two opposite sides of the frame, you will get all of these:
- Non-durable foundation of the frame
- Prone to dust accumulation
- Disproportional and slanted sides which is so distractive to look at
- An imperfect frame
The best buddy that you can rely on when you want to achieve a perfect do-it-yourself frame is a sliding miter saw. So here is your guide to achieve that perfect 45 degree angle for your rectangular frame.
The Materials and Tools
First, have these materials ready in your work area:
- 2 pairs of wooden pieces (and so this is equivalent to 4 pieces), all of the same thickness and kind, as you desired. Each pair will become of equal length after series of cutting will be done later on. One pair can be shorter than the other if you want to have a rectangular frame.
- Another piece of wooden board to be used for test cuts
- Pin (or sometimes, glue is used)
Then, prepare the other helpful tools that you will be needing, aside from your majestic sliding miter saw.
- A Backer board. This will serve as the support of all the cutting activities that you will be doing later on.
- Clamps
- Draftsman triangle
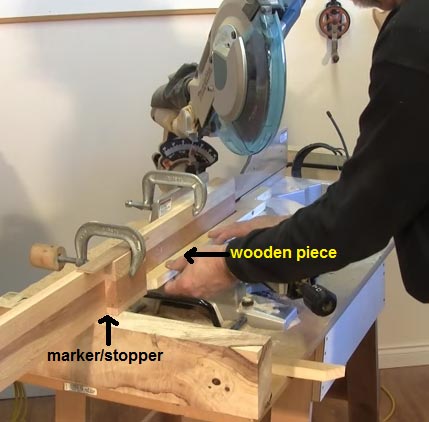
- Marker or stopper, which will be shown in one of the illustrations below. But you always have the choice to do some initiatives on how to make a similar one, still, with the same function.
- Trial wood
- Wooden Pinner
- Sand paper
Safety-First Tips
Before we will take the step by step process of creating your perfect frame, it is important to know the safety measure to take when operating the sliding miter saw:
- Always keep the miter saw unplugged when not yet in use or when you are still doing other measuring activities through it and especially under the blade
- Use a protective eye wear to avoid wood dusts get into your eyes
- Use ear muffs because the noise when cutting the wood may get intolerable at times and could be damaging to your eardrums.
Having in mind those safety measures, you can now proceed to the step by step process of making your perfectly angled frame.
The Real Stuff
Step 1: Set up the backer board by clamping it down against the saw’s fence. Make sure you tightened the clamp pretty well to avoid damages on the wood.
Step 2: Set the miter saw into 45 degree cutting angle by moving the miter lock handle into the 45 degree angle, as shown in its scale indicator. For complex frames of more than four sides, you need to compute the correct angle to use by dividing 180 degrees into the number of sides. For example, a pentagonal frame must have a 180/5= 36 degree angle.
Step 3: Although the scale appears to be in 45 degree angle already, we still need to test if the set angle is actually in 45 degrees. This must be done because there are times when the scale become inaccurate. You will now do the double checking through the 2 sub-steps below:
Step 3.1. Using the draftsman triangle, measure if the blade and the backboard are in perfect 45 degree together. When the triangle fits perfectly to the blade and to the back board as what appears in the illustration below, then you’re at the right track. Otherwise, you can always make the necessary adjustment to hit it right.
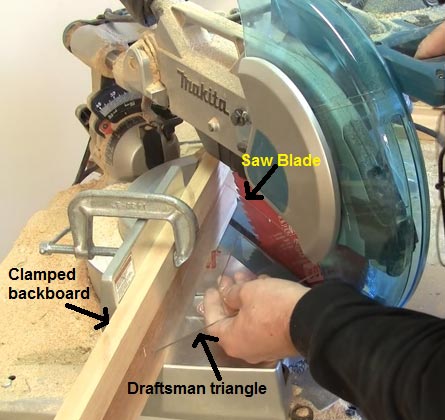
Step 3.2: Cut the spare wooden board for the test cut and see if it meets the 45 degree angle. By the way, you first need to cut the back board into the set angle since the blade will definitely pass through it too. After cutting the trial wooden board, measure it again using the draftsman triangle.
Now that the first three steps made the entire set-up ready for the correct angle cutting, it’s now time to cut the 4 wooden pieces which will make up your frame.
Step 4: Initially make a cut on one side of all the 4 wooden pieces into 45 degree angle. Cut them one by one and never do it altogether. Aside from its dangerous, you will surely fail to achieve the perfect degree.
Step 5: This time, you will need to clamp a marker or stopper against the backer board to make sure you will cut at the same length to each pair of wooden pieces. Cut the other side of each wooden pieces, still in 45 degree angle, but make sure that the length of each pair are the same.
After doing this in all 4 pieces, you must be able to get 2 pairs of equal lengths. Now you just saw how easy it is to come up with a perfectly cut frame sides using a sliding miter saw! So what’s left for you to do now is to put all your frame sides together.
Step 6: Put the 4 wooden pieces together to form the frame. You might be needing a 90 degree boarder or guide for your frame sides so as to keep the wood from moving while you’ll be pinning them. By this time, you will notice how the four sides perfectly fit together after carefully cutting through the 45 degree angle.
Step 7: Through a pinner, secure the wooden pieces to its corresponding opposite side one by one.
Step 8: Furnish your wooden frame through a sand paper and your wooden frame is all set.
You would definitely agree with me on how helpful our sliding miter saw had been during the whole time that we did this do-it-yourself project. In fact, there are a lot more amazing things that you can do through it so having one is really worth an investment.